The Big Stitch with the British Heart Foundation

For this year’s Big Stitch I’ve turned a man’s shirt in to a smart sleeveless top. Read how I did this here.

The British Heart Foundation’s ‘The Big Stitch’ has taken place during July, designed to inspire sewers to create something new from something old.

New top
My new top

If you’ve read my blog before you’ll know that although I’m new to upcycling,  I actually really enjoy it.

It was about this time last year when I upcycled something for the first time, and I had never really considered the vast array of potential new projects that could be found amongst various things previously donated by someone else.

Original shirt from bhf sutton in ashfield store
The original shirt

If you can be bothered to unpick an item of clothing from the charity shop you could end up with some fabric, a zip and buttons for a fraction of the price of buying all of the items individually.

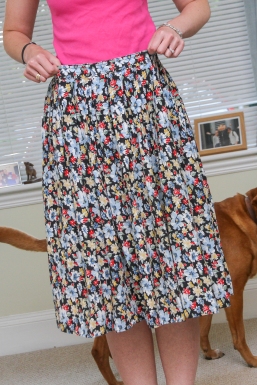
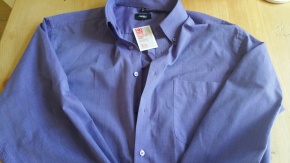
For this year’s Big Stitch competition I took a man’s shirt and turned it in to a top for myself.

To do this I unpicked all of the buttons, I will use these on another project, and then cut along all of the seams in the original shirt. I cut up the seam of the arms, cut off the cuffs and slowly opened each piece of fabric out flat on my table to see how much fabric I had to make something new with.

I really had no idea what I was going to make in the beginning, I considered making a book bag and make-up bag but finally settled on a sleeveless top.

I used the Sew Over Cami Top as a basis for my transformation although due to limited resources I couldn’t cut the the sections as directed on the pattern pieces. For the back – I cut two pieces adding a 1.5 cm seam allowance in the centre back seam and cut the facing pieces on the bias as I couldn’t squeeze them on to my fabric in any other way (I used the shirt arms to do this).

During the upcycling process
I unpicked the original shirt pockets so I had a blank piece of fabric to work with

I used the front of the original shirt (minus the button band) to make the back of my new top, and used the back of the original shirt to cut my new front on the fold.

This probably sounds like it took ages to do, but actually this was a fairly speedy process and more than anything I really enjoyed being creative in a different way.

Although the deadline for The Big Stitch has now passed, I’d still recommend popping along to your local charity shop to see whats available. In my opinion its a win win situation – you are donating to charity by purchasing something in the first place and then you get some new fabric and other supplies to use on a project of your choice.

Did you take part in The Big Stitch this year? I’d love to hear what you made. There are some fantastic pictures of competition entries on the British Heart Foundation website if you want to check them out.

Until next time, happy sewing 🙂

Tilly and the Buttons: Stevie Pattern review

This week I have reviewed the new Tilly and the Buttons Stevie pattern, find out how I got on here.

As soon as I saw the new Tilly and the Button’s pattern I thought it was right up my street. So, I got online as soon as I could to order myself a copy, carefully planning a bit of time to sew myself a new dress.

New Stevie Dress
New Stevie Dress

If you haven’t used Tilly’s pattern’s before they are ideal for beginner sewists as well as more experienced sewers wanting to make, in this case, a quick project.

The Stevie pattern can be made in to either a dress or a top and is ‘boxy’ in its design. The pattern has kimono sleeves and cute back detailing that can either be finished with a neck-tie or button closure. There are no darts or zips to insert and no sleeves to set-in – meaning there are limited pieces to both cut out and sew together.

Fitting

I cut a size 3 at the top and eased down into a size 4 at the bottom. I initially used the 1.5 cm seam allowance advised on the pattern, then tried on the dress to check the fit before I finished the side seams with my overlocker.

At this point the dress felt a bit too loose for me. The dress is supposed to be loose which is perfect for summer, although I just didn’t think it was a very flattering shape on me personally.

In order to tailor in my dress, I decided to put the dress on inside out and pin the side seams to get my desired fit. I then marked over my pins with my chalk to ensure that even if any of my pins fell out, I would still know where to sew when my project was back on my sewing machine.

New Stevie Dress 1
Out and about in my Stevie Dress

This process was a bit of trial and error and I repeated the above steps a couple of times before I was happy. Although this took a bit of extra time, I have to remind myself that its not about how quickly I make a project – its about enjoying the process and at the end of the day wanting to wear what I have created.

My dress 

I used a blue floral quilting cotton to make my dress. It’s a fabric I’ve had in my stash for a few months, but it thought it would be perfect for this.

Thanks to other people noting the dress comes out of the pack a little short, I also lengthen the dress my 4 inches as I wanted it to finish just above my knee (I’m 5’10).

I also lowered the neckline slightly and amended the shape of the neckline facing accordingly.

Back of stevie top
I used the button closure to finish my dress

I finished the back of my dress with the button option – although rather than using a hair elastic to make the ‘button loop’ I simply folded a piece of the dress fabric in to a similar shape and sewed that in place instead. I didn’t really like the idea of using a hair band as I’ve tried that before and with a bit of wear I discovered that it popped out of my facing (even though I stitched it in place) – but I guess this is down to personal preference.

I couldn’t wait to wear my new dress out and about so spent every spare moment I had last weekend to try to finish my project!

Next time 

I think I will try to make the top version next time with the neck ties instead of the button closure. I have a lovely cotton lawn fabric in my stash that has a pencil design on it so think I will use that 🙂

Until next time – happy sewing x

Simple Sew: Zadie Top

This week I made the Zadie Top, free in July’s Love Sewing Magazine. It was easy to make and perfect to wear in the warm weather.

I fancied making something quick last weekend, that I could wear with one of my denim skirts on a day out with my husband’s work.

36394590_10160508164805111_7971960970736041984_o
Feeding the Alpacas

We went to visit an Alpaca Farm in Leicestershire and got to feed the animals, I can’t tell you how excited I was!

36382832_10160508163755111_3881665956065312768_n.jpg
Looking a bit windswept in my Zadie top and Sewaholic Rae skirt

Anyway, back to my new top, I was excited to see that free in the latest edition of Love Sewing Magazine there is a quick Simple Sew  top to make called the Zadie Top. It’s a boxy kimono sleeve top that is designed to be easy to pull over your head – ready to go out the door, easy especially in the warm weather we are having in the UK at the moment.

The top is supposed to stitched down the centre seam and back seam (joining two sections together on each side) and finished with a facing. Although, instead I decided to cut my pieces on the fold and then tailor it in a little at both sides to get the desired fit.

I did find that the pattern came up quite big, I cut out a size 10 at the top of the pattern and eased down into the size 12 at the hip. It is supposed to be a loose fitting top but – it was a bit too loose for me so I took quite a bit out of the side sections and still have plenty of room to pop it over my head to wear comfortably.

The top is also supposed to be finished with a facing around the neckline – but I simply overlocked this area, created a double fold and stitched it in place. This worked okay for me, but it may not depending on how stable your fabric is.

I’m really happy with the finished result, particularly as I made it in just one evening when Neil, my husband, was watching the football. Plus, I picked up the floral material I used on holiday earlier this year – so that adds an extra something special to it for me.

I hope you’ve had a good week? What are you working on at the moment?

Until next time, happy sewing.

Becky x

Sew overwhelmed

I thought I would write a bit of a different blog post this week as I think it’s important to remember why as sewers we do what we enjoy and sometimes take a step back and reflect about why we love to be creative.

I thought I would write a bit of a different blog post this week as I think it’s important to remember why as sewers we do what we enjoy and sometimes take a step back and reflect.

20170906_192638_resized
Dressmaking in my sewing room 

As you know if you have read my posts before, I love to sew. I, like many others, often spend ages online browsing blogs, Instagram and vlogs in search of new ideas or inspiration for my projects but it can be a bit overwhelming when your ‘to sew’ list is growing and (in some cases) out of control!

IMG_20170830_191433_820_resized
Pinning a skirt waistband

As I write this post, I’m sat at home sheltering from the hot sunshine (I’m not good with the heat) and wondering which project I should make next. There are always so many competitions or sewing challenges to take part in online and my gut reaction is always to say ‘yes, count me in’, however, sometimes I just want a bit of ‘me time’ rather than racing to the finish-line to meet a deadline of some sort.

Our lives are filled with challenges of lots of different shapes and sizes and our hobbies, sewing or not, in my opinion should be enjoyed rather than being just another thing that stresses us out.

Being a part of the online sewing community is amazing. I’ve had the opportunity to meet some lovely people both in person and via social media. There are hundreds of gorgeous things being created all of the time and i’m so thankful to be a very small part of such a wonderful group of people – that inspire and encourage each and everyday.

From now on though, I’m going to be a bit kinder to myself – thinking what I want to make and how this will fit in with my other clothing. Hopefully this will allow me to take a much needed step back and remember why I sew – to chill out and be happy.

IMG_2046I don’t know about you but if I have an evening to myself, I can’t think of anything better than putting on my PJs, getting some snacks and sewing something – it takes me away from any worries and allows me to simply concentrate on being creative.

If you don’t sew already, I’d recommend it. I wish I’d started to sew years ago.

Have a wonderful weekend.

Becky x


Making a Tulip Skirt

My latest pattern obsession is with the Sew Over It Tulip Skirt. I’ve made three so far and hope to squeeze in another soon.

I’m not sure what is is about me and getting obsessed with patterns but when I find one I find one I like I LOVE it.

20180619_072243_resized
Cotton version

My latest pattern obsession is with the Sew Over It Tulip Skirt. I’ve made three so far and hope to squeeze in another soon.

I was initially a bit worried about if the shape of the skirt would suit me and if it would make my hips long bigger than they are, but actually I was pleasantly surprised that it clinches me at the waist and skims over my hips nicely.

So far, I’ve made one from a medium weight blue denim, one from a pink denim with a bit of stretch and another from a lightweight cotton (I lined this one as I thought it may not stick to my tights so much then).

The tulip shape is completely new to me. I mainly wear a-line skirts mixed in with the occasional pencil skirt for good measure, but I guess the tulip shape is a cool middle ground!

I’ve worn my skirts for lots of different things so far including into the office (not the blue denim one) and out for lunch etc. I’d love to be able to say I’d worn them on an evening out too but I’m quite boring these days and hardly ever go out for

27459502_10160171842680111_5061115020998254618_n
Blue denim version

drinks anymore!

Now I need to think about what my next version will be made of. Have you got any ideas? It would be great to hear some of your thoughts. I’ve uploaded a few pictures of my current skirts – I’m thinking may be a spotty version, a floral cotton sateen or a different coloured denim next perhaps?

Until next time, happy sewing 🙂

Becky

IMG_20180608_130351_728_resized
Pink denim version

Upcycling a floral skirt

My latest sewing project was upcycling a floral skirt I bought from a local charity shop.

IMG_8923
New floral skirt with button front

I had a bit of free time last weekend so decided to take a wander into town and browse the shops. I don’t know about you but I love exploring my local charity shops as there are often lots of bargains to be had and interesting pieces to be found that you wouldn’t necessarily find in the regular high street chain stores.

If you have read my blog before, you will know that I try to make as many of my own clothes as I can but sometimes it is nice to treat yourself to something new that is ready-made.

Last year, I got a taste of upcycling for the first time by turning a short sleeved jumpsuit I found in a charity shop into a  long sleeved cropped jumper. This sparked by enthusiasm to try to breath a new lease of life in to other clothes too, whether that be items I already have in my wardrobe or other items I could pick up from a second-hand shop.

My most recent project centres on a floral skirt I found in my local Sue Ryder charity shop. The skirt was too big for me but I loved the print of the fabric and thought it had a lot of potential to be transformed into something I would love to wear over the summer months.

IMG_8844
The original skirt had an elastic waistband and was too loose for me. 

Here’s how I did it…firstly I cut the original waistband off (this was a simple elastic band in-cased in a material tubing). Then cut straight up the back seam and ironed the fabric. I then measured the length and decided to cut a new waist band from the top of the original skirt (this worked well on two counts….1) I wanted to create a new waist band and 2) I wanted to shorten the length of my new skirt anyway).

The original skirt only had one seam so immediately I thought it had potential to be gathered – turning the original back seam in to a front button front closure instead.

I gathered the skirt to fit my waist band that I had interfaced and folded 1.5 inches in on both sides of the skirt (these were interfaced also) to form my new button placket.

To finish – I then added the waistband facing, measured where I wanted to position my buttons on the front, stitched them on and hemmed my skirt.

This was a fairly speedy project but it was so satisfying to know that I had been able to breath a new lease of life into a previously tired looking skirt that someone had donated to the charity shop I visited.

Refashioning and upcycling has become trendy in recent times, but I have not decided to try it out for this reason. For me its about being able to be creative and using my imagination rather than a regular sewing pattern to create something truly original. Its also a really inexpensive way to buy fabric whilst also being a bit environmentally friendly – reusing old fabrics rather than buying new materials. I’d definitely recommend giving upcycling a go if you haven’t tried it – I am no expert but I’ve really enjoyed altering the projects I’ve tried so far.

What are you working on sewing-wise at at minute? I’d love to hear about your projects.

Until next time, happy sewing.

Becky 🙂

My latest Coco Top to add to my collection

Here I share why I love the Coco pattern so much by Tilly and the Buttons.

The Coco top and dress pattern by Tilly and the Buttons was one of the first independent dressmaking patterns I bought and it opened my eyes to a whole new world of clothes that I could make myself at home.

IMG_8554
Latest Coco top

To date, I’ve used the pattern seven times and I’m sure that will not be the last. I love clothes that you can just pop over your head, that don’t need any particular styling and you are good to go. The Coco pattern allows you to do just that.

For my most recent top, I decided to slightly deepen the neckline and shorten the sleeves so I can wear it right now. As I write this blog post it is very warm outside so I’m sheltering indoors to take a break from the sun for a while. I know I shouldn’t complain, I love the summer but I don’t handle the heat too well for long periods of time 🙂

My new top is made out of a beautiful mustard cotton jersey that I picked up from Coles Sewing Centre in Nottingham when I met up with a group of lovely local sewers recently. I only bought one metre of jersey and with a bit of careful cutting, managed to squeeze in my new top.

As part of this post, I also wanted to share with you a few of my other Coco outfits and why I like them so much. So, to do this I’ve made a list!

IMG_20180313_165537_781_resized
Wearing my Coco dress on an evening out
  • Its quick and easy to make

    IMG_2743
    Loopback jersey dress
  • The instructions are suitable for beginners through to more advanced sewers
  • The pattern has loads of options as it can be made in lots of different colours / patterned jerseys and looks completely different
  • The dress looks great with a narrow belt
  • I lengthened my dresses by two inches so its perfect for tall ladies like me
  • It can be worn for loads of different occasions including to the office under a jacket or with pumps for a more casual day out
  • There are lots of pictures to be found online of other peoples Coco projects so there is lots of inspiration available at the click of a button

Have you made the Coco pattern? What did you think of it? I’d love to see or hear about your projects.


Until next time, happy sewing 🙂

IMG_2028
Long sleeved Coco top

Stretch: book review and Bibi Skirt

Read my Stretch! review and see my first project from the book. I made the Bibi Skirt, here I talk you through how I found making the pattern and the fitting alterations I made.

There is nothing I love more than making comfortable clothes that I can get loads of wear out of, so I was over the moon when I heard about Tilly and the Buttons new book Stretch! 

I was lucky enough to get bought the book as a gift and literally couldn’t wait to jump in and make my first project.

20180511_080224_resized.jpg
My new pencil skirt (please excuse my breakfast on the counter in the background)!

About the book 

If you are new to sewing with knit fabrics this book will guide you through the motions every step of the way. One of the things I like best about Tilly’s patterns is that the instructions are written in an easy to understand format, that makes them straight forward to use and helps you to increase your confidence as your skills develop.

The book includes info about buying knit fabrics (talking you through the different types available), fitting knit clothing, sewing with stretch fabrics on a regular sewing machine or with an overlocker and a variety of patterns that can be traced from the pattern pages at the back of the book.

Whether you like lounging at home in jogging pants and a hoodie or like to wear simple yet stylish dresses, this book has a bit of everything. Basically, as long as you like the idea of sewing with knit fabrics, this book will have you sorted!

What I made 

I made the Bibi Pencil Skirt. I’ll be honest, me and pencil skirts don’t normally get on! The amount of times I have gone in to shop changing rooms and tried on ‘ready to wear’ fitted skirts and they have not looked great cannot be counted on two hands. The problems normally arise as I have a small waist and larger hips, plus I’m quite tall (5’10) so generally I’m just not the right shape to buy shop-ready pencil skirt designs!

Anyway, who cares about shop-bought when you can just make your own?! If you haven’t made a pencil skirt before I think the Bibi Skirt would be a good one to start with as it only has a couple of pattern pieces (one cut four times for the skirt and a second for the waistband).

20180511_080158_resized
Bibi pencil skirt

How I found making my new skirt 

Well, the book suggests that the skirt is crying out for different coloured panels to be used – may be one colour for the side panels and another colour for the panels at the front and back. I’m sure this would look fab on loads of people, but when I tried it I just didn’t think it was for me. Initially, I cut out two panels in a emerald green ponte roma and the others in a floral knit. I sewed it up (this is pretty quick to do), and tried it on but it just didn’t suit me. I felt really ‘hippy’ in it as the different coloured panels were drawing my eyes to the widest part of my bottom / hips, basically I just knew I wouldn’t want to wear it if I felt uncomfortable.

So, I decided to ditch my first effort (I always find it sad to put something I have spent time making in the bin) and start again.

My husband said that he liked the skirt shape on me which was lovely of him as wearing close fitting skirts is new to me, I’m normally more of an a-line girl.

Second time around was SO much better. I used a green ponte fabric that has a black rose design printed on it, I picked this up from a local shop. The skirt can be made out of a metre of fabric so it was not only easy to make, it is fairly inexpensive too.

The fitting

I found that the hips fitted me correctly but the waist so a bit baggy at first. I would recommend basting the skirt together on your sewing machine to try it on inside out, this way you can check the fit and mark where you need to make any changes.

When I was happy with the fit, I then used my overlocker to stitch it together. I used the same fitting method for the waistband to, I basted it to the skirt, alining the side seams and seeing where I needed to bring it in a bit.

Changes made

Apart from the fitting described above, I added two inches to the hem of the skirt (before cutting it out) as I wanted my hemmed garment to come just above my knee. This is something I often do with Tilly’s patterns as I find they always come up a bit short on me.

Would I recommend it?

Yes, definitely! I’ve worn my Bibi Skirt into the office a few times, but I think it would also look nice dressed up with heels  for a more snazzy night out on the town.

Can’t wait to start my next Stretch! project – not sure if I’m going to make the Frankie Baseball T-Shirt or the Joni Dress next, I will keep you posted.

Have you made anything from this book yet? I’d love to hear about your projects 🙂 

Until next time, happy making x


Sew Over It Cami Top – perfect for summer

Carrying on with my mission to make myself clothes that I can get maximum wear out of, I made the Sew Over It Cami Top.

Carrying on with my mission to make myself clothes that I can get maximum wear out of, I considered where I had a gap in my wardrobe and decided I needed more tops that can be dressed up or down depending on the occasion.

29749809_10160171840345111_887828973442359733_o
Wearing my cotton lawn cami on my recent trip away

Enter the Sew Over It Silk Cami Top Pattern. I’ve never made a cami top before, in fact I am often completely put off making them as the idea of having to ‘turn through’ tiny shoe-string straps fills me with dread.

However, the Sew Over It Cami Top is different. It has quite sizeable straps, plenty wide enough to both construct easily and when made up is fine to wear a bra underneath.

The PDF pattern didn’t take long to piece together as it is such a quick project too, which is always a winner in my eyes.

The pattern suggests using French seams although I instead stitched the top up in the ‘regular’ way and overlocked the inside seams instead. I don’t think it really matters – I guess it just depends how you want it to look on the inside.

27459502_10160171842680111_5061115020998254618_n
Out and about in my silk cami

So far, I have made two of these tops but sure I will make more. One is made in a cream cotton lawn and the other is made in a grey sateen fabric with a flamingo print. I also have a few other bits of fabric in my stash I’m already thinking may work as a cami too so I will share any more I make on Instagram! I managed to get both tops out one a metre of fabric (with a bit of creative cutting) so its a great stash-buster if you want it to be.

I’ve already worn these tops on my recent holiday, out for food and plan to wear them into the office over the summer months maybe tucked into a skirt.

Before I make any of my sewing projects I tend to do a bit of looking around online to find inspiration. The idea of sharing creativity to me is ace so I hope you enjoy my blog as much as I enjoy seeing all of your wonderful makes.

I’d love to hear what you’re making at the moment.

Until next time, happy sewing!

My Sew Over It – Mia Jeans

Jeans for me are an essential wardrobe item so I decided to make the Sew Over It Mia Jeans and love the pattern!

Jeans for me are an essential wardrobe item. At the start of this year I decided that I wanted to make myself a few more  clothes that I can wear all of the time, rather than just launching into making cute dresses etc that can only be worn on special occasions.

IMG_3808
New Mia Jeans (don’t ask why I’m jumping on the bed – just felt like it!)

My free-time wardrobe is essentially denim, whether it be me wearing my favourite denim skirts or pulling on a pair of comfortable jeans – I seem to go to my ‘denim staples’ more than anything else.

So, a few months ago I decided to treat myself to the Sew Over It e-book called ‘My Capsule Wardrobe’ written by Lisa Comfort. 

This was a first for me really as I had never bought an e-book before and had never really been interested in the concept of ‘digital learning’. However, as the Sew Over It book is filled full of cool projects I felt were right up my street I decided to make an exception and purchase a copy.

Having already made the Molly Top (the Molly Dress is still on my ‘to sew’ list but haven’t got round to it yet), I wanted to have a go at making the Mia Jeans.

If you are unfamiliar with this pattern, I would say the finished product is more like a jegging than stereotypical jeans as they don’t have any front pockets and are a fairly skinny design through the legs.

Having not made any jeans by myself before, I read a few reviews of how other people got on online and discovered a really helpful ‘how to construct the front fly’ video on the Sew Over It You Tube channel. This was sssooo helpful, as I think I may have struggled with the construction of this otherwise.

I ordered the stretch denim for the project from Sew Over It and then picked up a regular zip and jeans button from my local market.

IMG_3811-2
A view of the jeans from the side!

The instructions are easy to follow for this project in the e-book and helpfully you can amend the seem allowance down the side seams to suit you. The pattern suggests that you machine tack the side leg seams in place with a 2.5cm seam allowance then try on the jeans to see how they fit. you can then adjust as needed before stitching in place for real.

I found that the 2.5cm was fine for me, although now I have been wearing the jeans for a while I think next time I may make the calf area slightly looser for comfort.

The pattern suggests using a stretch interfacing for the waistband, which is a good idea if you want the waistband to mould to your body shape. I’m pleased I followed this tip as I think if I’d used a regular interfacing the jeans may have been too stiff around the top.

Unfortunately, the denim I used doesn’t hold its shape very well so after a couple of wears they do need to be washed but generally I love the fit.

The only point (apart from maybe altering the seam allowance slightly) I would change next time would be tailoring in the ankle seam slightly so they look more like shop-bought skinny trousers.

If you are taller than me (I’m 5’10) you may also wish to make the jeans a bit longer – they sit around my ankle but look ace with pumps / flat shoes and will be perfect to wear when the weather finally warms up!

Overall, I would certainly recommend making these jeans and I will definitely sew them again myself at some point 🙂

Have you made these jeans before? I’d love to hear what you are crafting at the moment.

Until next time, happy sewing.