Inspired by Grease the movie – part 1

A few weeks ago, I started imagining what I could make as part of the #Sewingthescene  competition on Instagram. To take part in the competition you need to make something for your everyday wardrobe inspired by film or TV and then share it to your Instagram account tagging @theunfinishedseamstress and using the designated hashtag.

I wanted to make something inspired by one of my all-time favourite films so in the end settled on Grease, made in 1978 but set in the 1950s.

IMG_20170830_191433_820_resized
Pinning the waistband facing

With much of the drama focusing around the Rydell High School students – the Pink Ladies play a key role in the film.

As many of you will know, the Pink Ladies wore pink shiny jackets with all of their outfits so I took pink as my first colour inspiration. My second colour from the film was black – based on the many costumes worn by the character Rizzo.

My makes

As part of a two part blog series I am going to take you through my adventures of making my #Sewingthescene outfit, with this edition focusing on the Grace Skirt by Simple Sew Patterns.

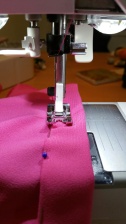
I made my skirt out of a bright pink crepe fabric that I picked up last year from Guthrie and Gharni in Birmingham. The fabric has been sitting in my stash for months, so I thought this was the perfect project to use it for!

My second make is going to be the Sew Caroline Sugar Pop Top made out of a plain black crepe kindly gifted to me by someone at work.

The Grace Skirt

If I’m honest I have been meaning to sew the Grace Skirt for ages. I’ve seen lots of pictures online of lovely looking versions of the pattern so was keen to get stuck in.

Inspired by the period the film is set in, the 1950s, I opted for a pleated knee length skirt that will definitely get loads of wear in my day-to-day wardrobe.

IMG_7922
My new skirt

The pattern is easy to follow, although I did find that, even following the correct seam allowances, the pattern came up a little looser than I was expecting at the waist. This was an easy fix though as I just added in a couple of extra ‘mini pleats’ at the back of the skirt and made some of the bigger pleats slightly deeper, ensuring I matched the size of the pleats to the best of my ability around my garment.

The pink fabric did make my eyes go a bit ‘crazy’ a couple of times when I was trying to match everything up, but it was worth the effort.

As my fabric was really lightweight I decided to interface both the inside and outside waistbands to provide a little more structure, this seemed to work well enough.

I also added an anti-static cream lining to the inside of my skirt, following the same pattern as the main part of the skirt (adding in the pleats in the same way but missing out the waistband part).

If I was to make this skirt again though (and I’m sure I will) I would simply add a plain A-line skirt lining inside to reduce any extra bulkage.

My invisible zip was also a nuisance due to the amount of bulk  around the centre seam so again I will keep that in mind for my next attempt.

20170906_192638_resized
I allowed a one inch hem

Overall

I am pleased with my final project overall. I don’t find crepe the easiest of fabrics to work with as it moves around quite a lot, however, it is worth it in the end as you can achieve a lovely ‘soft and floaty’ look. Albeit I don’t think my final skirt is one of the best things I’ve made, but it was a good first attempt at a skirt I will certainly try again in the future.

Review: the Sienna Dress by Simple Sew patterns

I recently completed my Sienna Dress by Simple Sew patterns and wanted to tell you how I got on by giving you the lowdown of how I found the pattern.

20170804_163857_resized_1
My finished dress – before I altered the sleeves

I’ve made quite a few Simple Sew patterns before so was generally confident that the sizing would be okay for me.

To be honest, I rarely make trial garments as I am always too keen to get on and wear what I have created. Although, as most sewists will know, sometimes this means you have cut into ‘good’ fabric and the project won’t work out the way you had hoped.

Taking my chances, this time I decided to dive straight in and make my new dress. I was eager to make the pattern as soon as I saw it advertised online, I even visited a few different supermarkets to pick up my copy!

Sizing

I made the size 8 at the top of the bodice and traced between the lines down to a size 10 at the waist. As I’m tall, I then added an extra 2cm onto the length, after measuring from the shoulder to the waist seam.

I made the size 10 skirt although the bottom section of the pattern is really full so as long as your waist measurement is correct you can’t really go too far wrong.

Design details

20170804_163815_resized
A view of the top of my dress. I love the neckline shaping!

I decided to make the sleeved version. If I’m honest, it may be because I was tired when making the pattern but it took me ages to get my head around the sleeve instruction. That was until I had a ‘light bulb’ moment and realised that the sleeve doesn’t meet under the arm like a ‘regular’ sleeve, it literally sits across the top of the shoulder – it is a cap sleeve instead.

Everything made a bit more sense when I realised this design detail and I was well away.

The only things I was disappointed about with the sleeves was 1) I’m not sure if they suit me and 2) when I’d overlocked the hem of the sleeve and then stitched it up,  I didn’t realise that when wearing the dress from the front you can see my different coloured overlocking stitches in the back part of the sleeve.

IMG_20170804_175838_838_resized_1
Inside my dress I lined the top in the same fabric and the bottom with a plain anti-static black material.

So, I have decided to add in my own design detail by folding the sleeve in from both the right and the left to create a small fold. Then adding a small black button into secure my new design in place. You can hopefully see what I’m talking about in the photos I have uploaded.

Elsewhere in the dress, I found that after sewing the pockets into place (and I don’t think I allowed a huge seam allowance) they were not as deep as I’d like them to be. Next time I will either re-draft the pattern piece to make them a bit bigger or decided to not add them in at all. Although I do love to add in a pocket to my outfits where I can as they are so useful!

Overall

Overall, I really like my finished dress. The instructions were fairly straight forward and I think I will be able to wear my new outfit on lots of different occasions.

20170807_202312_resized_1
My new sleeve detail

If I make it again though, I will opt for the sleeveless version as I think I will be better suited to this style!

Happy sewing 🙂

Becky

My first blog post!

An update on a few of my makes from the last 12 months.

For my first ever blog post I thought I would share a bit about myself and what I have been making over the last year or so.

I would describe my style as modern, but I don’t really have a particular niche. I like to be comfortable on my days off but look nice at the same time. I mainly wear dresses and skirts in the week, as well as when I go out, but also opt to wear denim skirts and jeans for much of my time at home.

I started sewing about four years ago as I felt like I needed a new hobby, and I have literally never looked back since.

Don’t get me wrong, I couldn’t thread a sewing machine in the beginning or sew in a straight line so after many trials and tribulations I finally made my first cushion cover. A memory I hold dear!

In more recent times though, I would say that dressmaking is definitely my favourite pastime rather than making bits and bobs for the house etc.

Some of my recent makes have included:

*A top from the Simple Sew Pattern called The Chelsea Collection. I love this top so much so I’ve made it twice in the last 12 months. One is a shorter floral version and the second is slightly longer so I can wear is with my jeans and not show my tummy.

IMG_20170519_151922_908_resized
Simple Sew top

*The Coco dress by Tilly and the Buttons. I’ve read loads of people say online that this is their ‘go to pattern’. I’d say the same. I’ve made it a few times over the last couple of years, my most recent version being made out of a lovely ponte roma fabric that has a smart feel to it. I’ve worn it many times into work and also on my days off.

IMG_5796_resized
My Cambie Dress with a circle skirt

*The Cambie Dress by Sewaholic patterns. The last version I made was out of a red cotton fabric I bought online. I changed the skirt section into a circle skirt, which I love! In an ideal world I would have made the skirt slightly longer but I had limited fabric to work with so I did the best I could. I’m really pleased with the end result though and I’m already dreaming about my next version! If you haven’t tried Sewaholic Patterns I would definitely recommend them, I’ve always been pleased with the quality of the instructions and the way my finished garments have turned out.

*The Hollyburn Skirt by Sewaholic Patterns. I made the slightly longer version thinking that it would take me from summer into winter and I would get

IMG_20170603_112457_683_resized
Hollyburn Skirt

maximum wear out of my project. This probably took me a bit longer than it should have as I decided to add a lining to the skirt so I can wear it with tights in the colder months. Again, I love the final skirt, I always feel nice when I wear it if you know what I mean!

*The Linden Sweatshirt by Grainline Studio. I’ve never really been a sweatshirt wearer before I tried this pattern but I really like this as it is not too baggy and it’s got a really feminine feel to it. There are loads of possibilities to use different coloured fabrics for the arms, main body, neckband, waistband and cuffs so it’s entirely up to use what you choose.  When I find a pattern I love, I tend to make it a few times and this is no exception. Here is a photo of my navy blue spotted version.

FB_IMG_1485804646468_resized
Linden Sweatshirt

I hope this has given you an insight into what I enjoy sewing 🙂

Becky