
I was delighted to be asked to review the Jennifer Lauren Mayberry Dress, after answering Jen’s call for pattern reviewers a while ago online.
If you have read my blog before, you will know that I like to make clothes that look smart-ish but are also easy to wear.
I like to get the maximum wear out of all of my handmade clothes so if I can have the chance to wear them both at home and at work, that works really well for me. The Mayberry dress, in this case is right up my street as it is a shirt-waisted dress that looks classic in its silhouette but it is also comfortable to wear. There is nothing worse (in clothing terms) than being zipped or buttoned into something that is too tight to either eat or sit-down in.
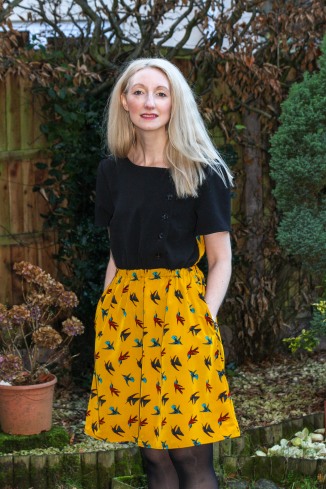
I made the size 10 dress with the B cup. The dress pattern includes three different sleeve lengths but I decided to go for the short sleeve as I thought I could then layer the dress with a cardigan in autumn / winter but also wear it by itself in the warmer months of the year.
Sizing chart and fabric required
I found the sizing chart to be easy to read as it included with measurements in cm and inches.
The pattern also outlines clearly how much fabric you will need for the different sizes in the pack and the alternative sleeve lengths which is helpful. I always find it really annoying when a pattern says you will need a lot more fabric than you really do, I didn’t find his to be the case here though.
Printing the PDF and sticking it all together
The pattern guide provides a helpful outline showing you what page numbers you need to print and how the pages need to be stuck together. I thought it was great how I could just print the pages I needed for both my cup measurement and for the version I was making. Each of the sleeve lengths are printed separately (shirt, ¾, long sleeve and cuff), again I liked this feature as it just makes the process a bit more straight forward. I’ve found in the past that if I cut a shirt sleeve straight from the pattern I then have the keep the remainder of the pattern piece to stick back together at a later date if next time I wanted to make the longer sleeves version.
Instructions
The pattern booklet is really clear to read and understand, if you take the time to read it. Jennifer includes clear headings directing you how to grade between sizes, telling you what the seam allowance is and suggesting what your fabric layout plans should be.
When you get into the garment construction process – Jennifer guides you through each stage of the process step-by-step. She uses both text and imagery to show you how to tackle each step, which makes the directions a bit easier to digest.
I really like it when pattern instructions include pictures – I don’t always understand text alone so I think this pattern will be enjoyed by people who like to learn by seeing – similar to me!
Fabric choices
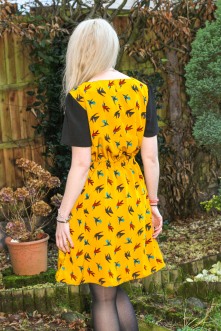
I think this pattern would work well made up in lots of different fabrics. I decided to use a mixture of two fabrics – a plain black crepe on the top and a bold mustard bird print on the skirt and back blouse (this is a peach skin fabric).
I had both of the fabrics I used in my fabric stash already. I knew I didn’t have enough of the mustard fabric alone, I decided to mixture the two fabrics together to make my dress.
I’d be careful not to use any fabrics that are too heavy, as the dress may not work too well around the drawstring area as the drawstring channel may end up being too stiff or lumpy.
Pattern alterations
I found the pattern sizing to be fine for me. When I first made up the dress I thought it looked really wide but as soon as you add in your drawstring or in my case elastic, it soon starts to look more clinched in at the waist.
I’m not a big fan of a drawstring waist as I often find that I spend too much time pulling up my tie or readjusting the bow I have made using the ties. So, in this case I decided to replace the drawstring with some (just under one inch wide) elastic as I wanted my dress to being quite fitted at the waist.
To do this, I used the same instructions as noted in the pattern pack I used missed out the step that says you should either make button holes or insert eyelets into the skirt front. Later in the pattern Jennifer describes how to stitch up the inside of the drawstring channel – I followed this instruction but just left a small inch section open at the inside seam this allowed me to thread through my elastic using a safety pin to guide the elastic through the channel. I then stitched up the final part of the channel when I was happy that the elastic was lying flat. I also added a few machine stitches ‘in the ditch’ at the side seams to keep my elastic in place.
As I used peach skin fabric for the skirt, I decided to include a narrow hem. I wanted to just overlock the hem and turn it up to sew in place on my machine. However, to do this I found that the pattern was too long for my liking so I decided to trim the skirt length by 1.5 inches. This is just personal taste though, I just like me skirts to be finished just above my knee (I’m 5’10 if that’s helpful).
Overall
Overall, I enjoyed making this dress although the biggest drawback was sticking the pdf together. Although the instructions are really clear, the actual cello-taping of the pages together seemed to take me a full evening.
I’m not sure how long the dress took me, may be about 8-10 hours split over a few days and evenings – wherever I found I had a bit of spare time.
I’m hoping to wear the dress out and about to a few different occasions, I think it will look really nice to thick tights and a cardigan in the cold weather we are having here in the UK at the moment.
I hope this is helpful if you are planning to make the Mayberry dress soon.
Happy sewing.
Becky
